Generating Django rest framework API Documentation using drf-yasg library
Introduction
In this article, I would be building an application within a School Management System project with Django rest Framework
Our major objective is to create a few endpoints and generate Documentation for the users of our API
What is a Documentation?
Documentation in software development is the information that describes the product to the people who develop, deploy and use it. It includes technical manuals and online material, such as online versions of manuals and help capabilities.
API documentation is technical content that documents the API. It includes instructions on how to effectively use and integrate the API. It also provides updates on the API’s lifecycle such as new versions or retirement. Some aspects of API documentation can be generated automatically via Swagger or other documents.
Why do we write API Documentation?
A large reason why API documentation is important is to increase API adoption. Comprehensive documentation on all of the functionality, how to effectively use and integrate, and updates on the API lifecycle improve the experience for those using your APIs.
Could you use an API without documentation? Sure, it’s technically possible. But you can grasp the API’s technical content and integration instructions much better with complete and accurate documentation.
Creating a Virtual Environment with Anaconda
This article is focused on documenting our APIs endpoint but if you want to understand the reason virtual environments are needed during development and how to download Anaconda visit this page
I believe you now have Anaconda installed just to be sure, you have successfully installed Anaconda on your PC run this command
conda -V
output:
3.0.7
Now that we are sure conda has been installed on our PC, let's create a virtual environment that we would be using for this project
To do that we need to run the command below
conda create -n djangoenv python=3.9
The command above creates a new virtual environment, where our virtual environment name is djangoenv you can use any name you prefer and we specify the Python version for the environment you can also use any Python version above 3.6
With that, we have successfully created our virtual environment
Activating the virtual environment and installing the required libraries
Now that we have everything all setup, we are ready to activate our virtual environment and install the required libraries for the Django project
We create a folder which would be our project folder, with these commands
# Create the project directory
mkdir School management system
To activate our virtual environment we need to run the command below
conda activate djangoenv
Then the virtual environment gets activated, and we can now install the required libraries into the virtual environment, The commands below help to install Django and Django Rest Framework onto our virtual environment
# Install Django and Django REST framework into the virtual environment
pip install django
pip install djangorestframework
Setting up the Django project and students' application
To set up a Django project we need to run this command below, provided our project name is sms (school management system) you can name your project as you want.
django-admin startproject sms
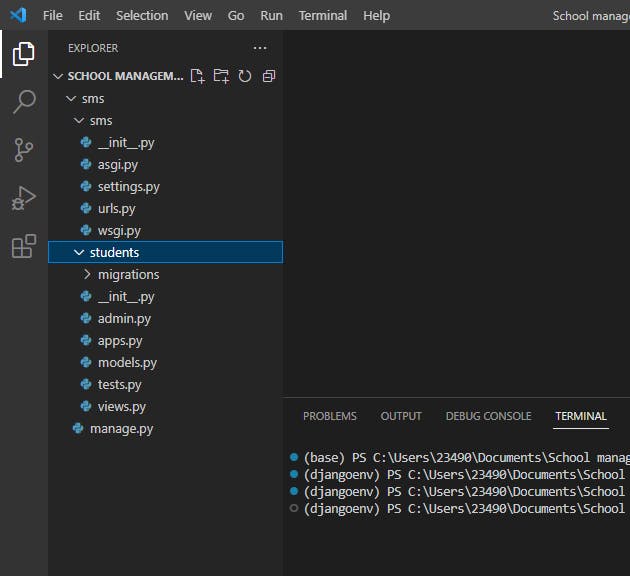
After running this command successfully we now have a folder structure like in the image below

The next thing to do is create student's app, which is an app that would handle everything about students of the school
We can create the student app with the command below
django-admin startapp students
Now our folder structure should look similar or just like in the image below

Now, sync your database for the first time, How do we sync our database? We make migrations.
Migrations are Django’s way of propagating changes you make to your models (adding a field, deleting a model, etc.) into your database schema. In our case, we are trying to tell Django about of default User model
We can sync our database using the command below
python manage.py migrate
Now we need to add the following modules into our INSTALLED_APPSlist in our project's settings.py
INSTALLED_APPS = [
    ...
    'rest_framework',
    'students'
]
Creating Project's URL patterns
We need to create URL patterns for our project url.py file which helps connect our student urls file to the project urls using the include function
from django.contrib import admin
from django.urls import path, include

urlpatterns = [
    path('admin/', admin.site.urls),
    path('', include('students.urls'))
]
The above code tells Django where to find our student app urls.py file.
Creating Student's App Database Model
In our students app directory, we have models.py created automatically by Django when we ran the django-admin startapp students command. We need to manually create the following Python modules in the students directory urls.py, serializers.py ,The urls.py handles URLs patterns while the serializers.py handles Serialization
We should now have something similar to the image below

Let's start by creating our Student model in our models.py
from django.db import models

# Create your models here.
class Student(models.Model):
    GENDER_CHOICES = [
                        ("Male", "M"),
                        ("Female", "F")
                      ]
    name = models.CharField(max_length=255)
    grade = models.IntegerField()
    age = models.IntegerField()
    home_address = models.CharField(max_length=55)
    date = models.DateTimeField(auto_now_add=True)
    gender = models.CharField(max_length=6, choices=GENDER_CHOICES)

    def __str__(self) -> str:
        return self.name
The above code is what represents our Student Database table, we also need to sync our database by running the command below
python manage.py migrate
python manage.py makemigrations
We now need to perform serialization, hence we need to create some serializer class
Serializing Student model using ModelSerializers class.
In our Serializer module students/serializers.py we would create a serializer for the Student model using ModelSerializers, You can learn more about serialization on Django Rest Framework official docs
class StudentSerializer(serializers.ModelSerializer):
    class Meta:
        model = Student
        fields = "__all__"
With the snippet above we have successfully created a serializer class that would serialize all the fields in the student model.
That's all that needs to be done in our serializer module.
Creating Student App views
Right, we'd better write some views then. Open students/views.py and get typing.
We would be creating our API views using the ViewSet just to get everything set up faster,
Django REST framework allows you to combine the logic for a set of related views in a single class, called a ViewSet. In other frameworks you may also find conceptually similar implementations named something like 'Resources' or 'Controllers'.
A ViewSet class is simply a type of class-based View, that does not provide any method handlers such as .get() or .post(), and instead provides actions such as .list() and .create().
The method handlers for a ViewSet are only bound to the corresponding actions at the point of finalizing the view, using the .as_view() method.
Typically, rather than explicitly registering the views in a viewset in the urlconf, you'll register the viewset with a router class, that automatically determines the urlconf for you.
from rest_framework import viewsets
from .serializers import StudentSerializer
from .models import Student


# Create your views here.
class StudentViewSet(viewsets.ModelViewSet):
    """
    API endpoint that allows students to be viewed or edited.
    """
    queryset = Student.objects.all()
    serializer_class = StudentSerializer
Learn more about how the ViewSet class works here
Creating URL Patterns for students App
Okay, now let's wire up the API URLs. On to students/urls.py
Because we're using viewsets instead of views, we can automatically generate the URL conf for our API, by simply registering the viewsets with a router class.
Again, if we need more control over the API URLs we can simply drop down to using regular class-based views, and writing the URL conf explicitly.
from django.urls import include, path
from rest_framework import routers
from .views import StudentViewSet

router = routers.DefaultRouter()
router.register(r'students', StudentViewSet)

# Wire up our API using automatic URL routing.
urlpatterns = [
    path('', include(router.urls)),
]
Creating a simple function Based view
We would be creating an additional function view in students/view.py, this view is a simple view that returns the time a student joined the School management application
from django.shortcuts import get_object_or_404
from django.response import Response
from .models import Student

@api_view(["GET",])
def get_student_date_joined(request, pk):
    """A simple view to return the date and time a student signed up"""

    student = get_object_or_404(Student, pk=pk)
    return Response({"date_joined": student.date}, 200)
With the @api_view decorator we have created a very simple view that returns the date a user joined the platform
We now need to create a url pattern for this newly created view, In our urls module add the following lines of code
from django.urls import include, path
from rest_framework import routers
from .views import StudentViewSet, get_student_date_joined
router = routers.DefaultRouter()
router.register(r'students', StudentViewSet)

# Wire up our API using automatic URL routing.
urlpatterns = [
    path('student-date-joined/<int:pk>', get_student_date_joined, name='get-student-date-joined'), # new line
    path('', include(router.urls)),
]
The image below shows an example of response from our newly created API endpoint

Setting up our project for Documentation
The python module we would be using to document our API is known as drf-yasg, it's a very powerful python module used in documenting Django Rest Framework APIs
Compatible with
Django Rest Framework: 3.10, 3.11, 3.12
Django: 2.2, 3.0, 3.1
Python: 3.6, 3.7, 3.8, 3.9
Installation
The preferred installation method is directly from pypi:
pip install drf-yasg
In project's settings.py i.e sms/settings.py add the following lines:
INSTALLED_APPS = [
   ...
   'django.contrib.staticfiles',  # required for serving swagger ui's css/js files
   'drf_yasg',
   ...
]
In project's urls.py i.e sms/urls.py add the following lines:
...
from drf_yasg.views import get_schema_view
from drf_yasg import openapi

...

schema_view = get_schema_view(
   openapi.Info(
      title="School Management System API",
      default_version='v1',
      description="API Documentation for School management System",
      terms_of_service="https://www.google.com/policies/terms/",
      contact=openapi.Contact(email="contact@snippets.local"),
      license=openapi.License(name="BSD License"),
   ),
   public=True,
)

urlpatterns = [
   re_path(r'^swagger(?P<format>\.json|\.yaml)$', schema_view.without_ui(cache_timeout=0), name='schema-json'),
   re_path(r'^swagger/$', schema_view.with_ui('swagger', cache_timeout=0), name='schema-swagger-ui'),
   re_path(r'^redoc/$', schema_view.with_ui('redoc', cache_timeout=0), name='schema-redoc'),
    ...
]
This exposes 4 endpoints:
A JSON view of your API specification at
/swagger.jsonA YAML view of your API specification at
/swagger.yamlA swagger-ui view of your API specification at
/swagger/A ReDoc view of your API specification at
/redoc/get_schema_viewparametersinfo- Swagger API Info object; if omitted, defaults toDEFAULT_INFOurl- API base url; if left blank will be deduced from the location the view is served atpatterns- passed to SchemaGeneratorurlconf- passed to SchemaGeneratorpublic- if False, includes only endpoints the current user has access to
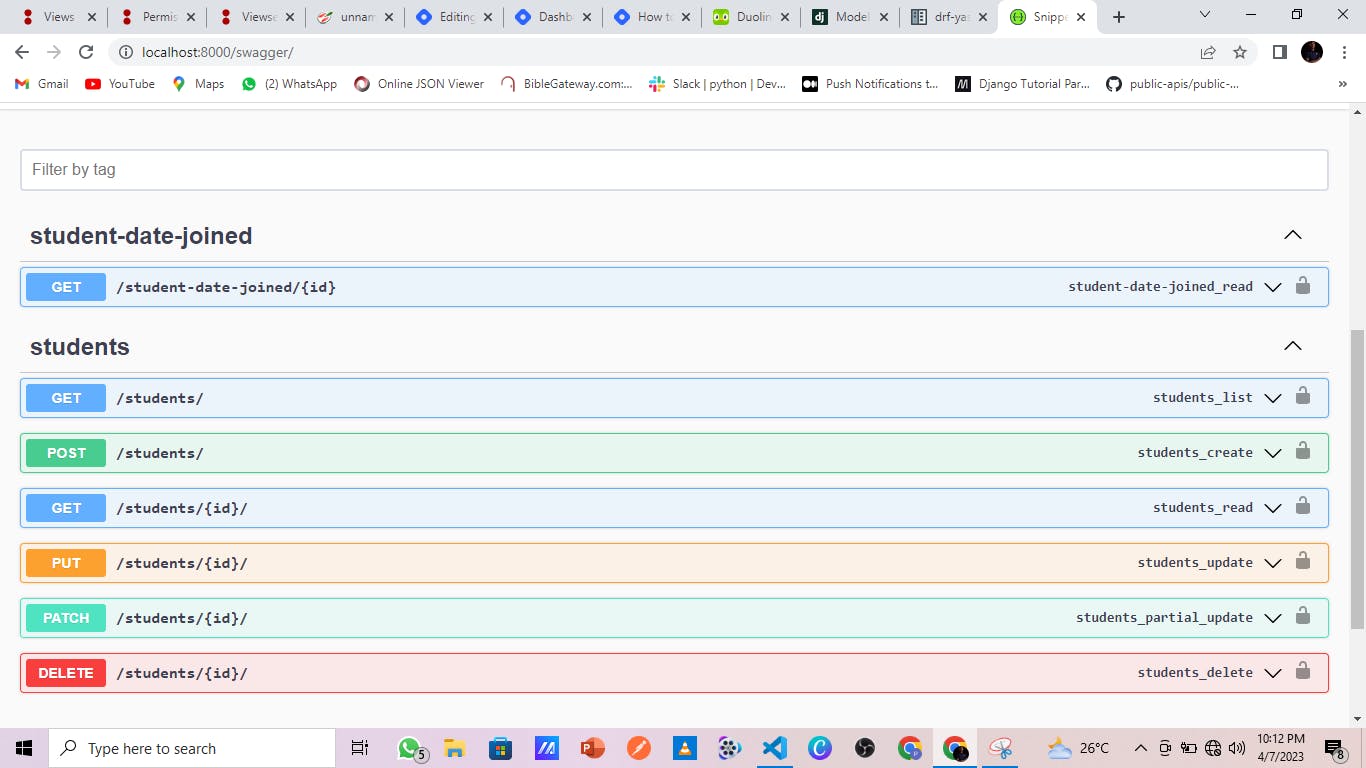
We can now view our API documention via localhost:8000/swagger/to view the swagger docs
The image below is what we should have

We can now view our API documention via localhost:8000/redoc/ to view the redoc API documentation

Now we have successfully generated well structured documentation for our API which is the aim of the article hope this article was helpful
Thanks for reading up until this point, feel free to ask questions if any.
