Table of contents
- Why do we need multiple image uploads?
- Prerequisites
- Setting up our Django Project and Django Application
- Configuring our project settings.py for Media Files
- Creating our URLs pattern
- Creating Inventory App models
- Serializing Inventory App models using ModelSerializers.
- Creating Inventory App views
- Testing Our API with Postman
Why do we need multiple image uploads?
In modern applications images have become very important for a better user interface and experience. Let's assume we are to build an e-commerce application or a social media platform like Instagram. I believe we all know we can post multiple pictures of a product on an e-commerce site or multiple pictures of ourselves on Instagram. So I know most of us reading this article can easily build an application with just a single image upload. In this article, We would build together an e-commerce API with Django Rest Framework and I would be explaining how we can achieve multiple image uploads with DRF(Django Rest Framework).
Prerequisites
Basic Knowledge of python Programming
Basic Knowledge of Django and Django Rest Framework
Ensure that python is installed on your local machine
Setting up our Django Project and Django Application
In this tutorial, we would be building an e-commerce website and we would be focusing on the inventory app.
The inventory app is an essential part of an e-commerce software, it handles and manages all product related information.
Firstly, we need to create a Folder. We all know we need to create Folders where we would keep our Django Project and every other file related to our project, name it as you wish but I would name it e-commerce. cd into the folder in any code editor of your choice
# Create the project directory
mkdir e-commerce
cd e-commerce
We need to create a virtual environment to isolate our package dependencies locally, you can use activate your virtual environment if you have any.
# Create a virtual environment to isolate our package dependencies locally
python3 -m venv env
source env/bin/activate  # On Windows use `env\Scripts\activate`
We need to install all required libraries into our virtual environment, we would be installing django and djangorestframework libraries
# Install Django and Django REST framework into the virtual environment
pip install django
pip install djangorestframework
Now, we need to set up a new Django project and our inventory application we can achieve that with the commands below
# Set up a new project with a single application
django-admin startproject e-commerce.  # Note the trailing '.' character
cd e-commerce
django-admin startapp inventory # initializing the inventory app
Now, sync your database for the first time, How do we sync our database? We make migrations.
Migrations are Django’s way of propagating changes you make to your models (adding a field, deleting a model, etc.) into your database schema. In our case, we are trying to tell django about of default User model
We can sync our data
We'll also create an initial user named admin with a password of password123. We'll authenticate as that user later in our example.
python manage.py createsuperuser --email admin@example.com --username admin
Now we need to add the following modules;
'rest_framework''inventory'
INSTALLED_APPS = [
    ...
    'rest_framework',
    'inventory'
]
We need to add the above code in our settings module, so that our django project can be aware of the modules
Configuring our project settings.py for Media Files
Still, in the settings module, we need to specify MEDIA_ROOT and MEDIA_URL
Warning
MEDIA_ROOT and STATIC_ROOT must have different values. Before STATIC_ROOT was introduced, it was common to rely on or fallback on MEDIA_ROOT to also serve static files; however, since this can have serious security implications, there is a validation check to prevent it.
MEDIA_URL
Default: '' (Empty string)
URL that handles the media served from MEDIA_ROOT, used for managing stored files. It must end in a slash if set to a non-empty value. You will need to configure these files to be served in both development and production environments.
#e-commerce/settings.py

MEDIA_URL = '/media/'
MEDIA_ROOT = os.path.join(BASE_DIR, 'media')
Creating our URLs pattern
Create URL patterns in the project's URL module e-commerce/urls.py and enable static and media file upload
from django.contrib import admin
from django.urls import path, include
from django.conf import settings
from django.conf.urls.static import static

urlpatterns = [
    path('admin/', admin.site.urls),
    path('api/v2/inventory/', include('inventory.urls'))
] + static(settings.MEDIA_URL, document_root=settings.MEDIA_ROOT)
The above code tells Django where to find our media files and also includes the URLs pattern of our inventory app
Creating Inventory App models
In our inventory app directory, we have models.py created automatically by Django when we ran the django-admin startapp inventory command. We need to manually create the following python modules in the inventory directory urls.py, serializers.py
The urls.py handles URLs patterns while the serializers.py handles Serialization
Let's start by creating our Product and ProductsImage model in our models.py
class Product(models.Model):
    CATEGORY_CHOICES = [
                        ("toys", "toys"),
                        ("foods", "foods"),
                        ("cosmetics", "cosmetics"),
                        ("fashion", "fashion")
                        ]
    name = models.CharField(max_length=50, blank=False)
    description = models.CharField(max_length=255, blank=False)
    category = models.CharField(max_length=9, choices=CATEGORY_CHOICES)
    slug = models.CharField(max_length=80, blank=False, null=False)
    price = models.DecimalField(max_digits=7, decimal_places=2)
    date = models.DateField(auto_now_add=True)

    def save(self, *args, **kwargs):
        self.slug = slugify(self.name)
        super().save(*args, **kwargs)

    def __str__(self):
        return "%s" % (self.name)
class ProductsImage(models.Model):
    product = models.ForeignKey(Product, on_delete=models.CASCADE,                                                    related_name='images')
    image = models.ImageField(upload_to="products")


    def __str__(self):
        return "%s" % (self.product.name)
From the code above we can conclude that we have a OneToMany relationship between the Product model and the ProoductsImage model . The save method of the Product model is to override the default save method and ensuring the product name is converted to a slug before being saved to the database, you can decide to remove the slug field from your model and the __str__() method returns the string representation of the model object.
The most important Field attributes to take note of are;
choices: this attribute allows us to choose from from different options like an HTML option Fieldupload_to : this attribute represents the folder name where the uploaded image files would be saved
related_name : it is the name used to access the ProductImage model through the Product model specifies the name connecting the two models
Serializing Inventory App models using ModelSerializers.
In our Serializer module inventory/serializers.py we would serialize both models using ModelSerializers, You can learn more about serialization on Django Rest Framework official docs
class ProductsImageSerializers(serializers.ModelSerializer):
    class Meta:
        model = ProductsImage
        fields = "__all__"

class ProductSerializers(serializers.ModelSerializer):
    images =  ProductsImageSerializers(many=True, read_only=True)
    uploaded_images = serializers.ListField(
        child=serializers.ImageField(allow_empty_file=False, use_url=False),
        write_only=True
    )

    class Meta:
        model = Product
        fields = ["id", "name", "description", "price", "date", "images",
                  "uploaded_images"]

    def create(self, validated_data):
        uploaded_images = validated_data.pop("uploaded_images")
        product = Product.objects.create(**validated_data)

        for image in uploaded_images:
            ProductsImage.objects.create(product=product, image=image)

        return product
This is the most important part of this Article, Here in the ProductsImageSerializer we serialized every field in the ProductsImage model using the ModelSerializer class and setting fields options to '__all__'
In the ProductSerializer above we need to do some tweaking to achieve the goal of uploading multiple images, using the ModelSerializer class we explicitly specify model fields to be serialized which are listed in the fields List above
The images serializer field would represent all image object that is related to the Product. NB: remember that our related_name was images in our ProductsImage model so we can't just name the serializer as we want it has to be the exact name as the related_name
The upload_images field is a ListField which has its child field as ImageField . It helps us get Lists of objects, Below is a quick overview of how the ListField Serializer works
A field class that validates a list of objects.
Signature: ListField(child=<A_FIELD_INSTANCE>, allow_empty=True, min_length=None, max_length=None)
child- A field instance that should be used for validating the objects in the list. If this argument is not provided then objects in the list will not be validated.allow_empty- Designates if empty lists are allowed.min_length- Validates that the list contains no fewer than this number of elements.max_length- Validates that the list contains no more than this number of elements.
For example, to validate a list of integers you might use something like the following:
scores = serializers.ListField(
   child=serializers.IntegerField(min_value=0, max_value=100)
)
We then override the ProductSerializer create method so we can loop over the uploaded_images List and create each image object in relation to the Product object
Look closely to understand the create method and what it does exactly
def create(self, validated_data):
        """
        the line below captures all the uploaded_images using the pop  method
        from the validated_data dictionary ,you can print the validated_data
        dictionary so you can get an overview of how it works
        """
        uploaded_images = validated_data.pop("uploaded_images")
        # the code below creates a Product object with the validated_data
        product = Product.objects.create(**validated_data)

        # We loop over the uploaded_images and created an Image object and
        # create ProductsImage objects relating to the product

        for image in uploaded_images:
            ProductsImage.objects.create(product=product, image=image)

        return product
That's all that needs to be done in our serializer module.
Creating Inventory App views
We need to create Views in our views module inventory/views.py
from rest_framework.generics import CreateAPIView
from rest_framework.parsers import MultiPartParser, FormParser
from inventory.models import Product
from inventory.serializers import ProductSerializer

class ProductCreateView(CreateAPIView):
    parser_class = [MultiPartParser, FormParser]
    serializer_class = ProductSerializers
We would be using the generic API View CreateAPIView read more about generic API Views on Django Rest Framework docs, We specify our Parser classes and serializer class that's all that needs to be done on the ProductCreateView
Let's create URL pattern for the view we just created in our Inventory app inventory/urls.py module
from django.urls import path
from inventory.views import ProductCreateView

urlpatterns = [
    path("new-product", ProductCreateView.as_view(), name="create_product")
]
Testing Our API with Postman
Why are we testing with postman, And not with Django the browsable API ?
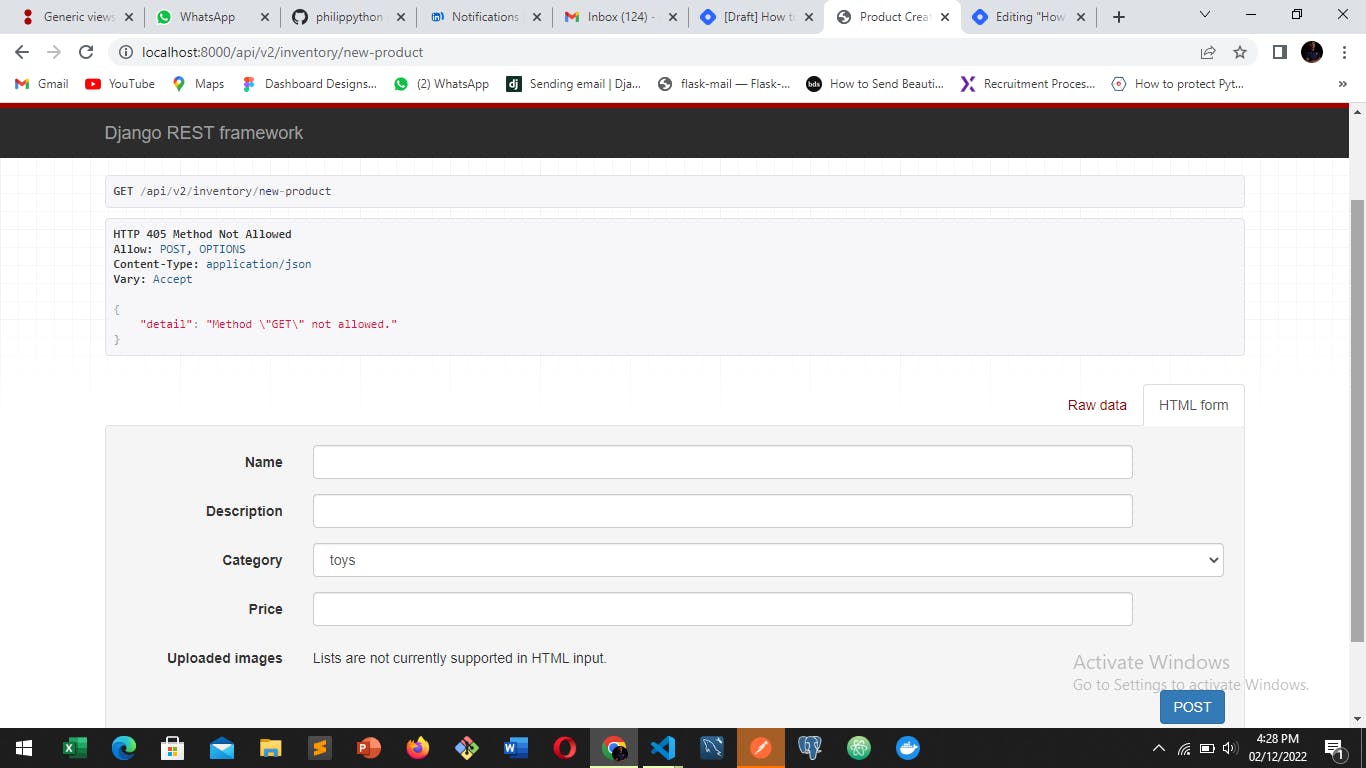
Let's take a look at what our browsable API views looks like at this point

From what we can see in the browsable API we can't upload any image files through this form or the raw data that's why we need Postman to test out our Application
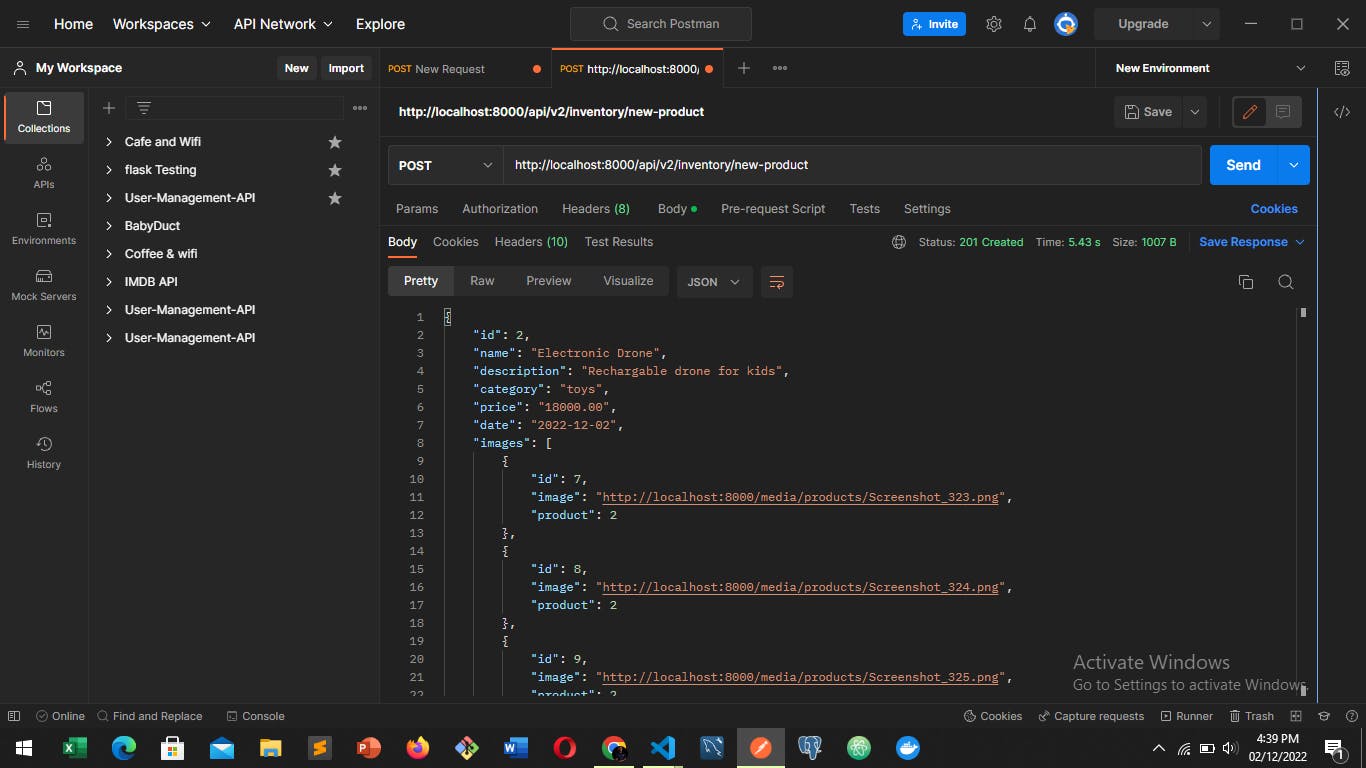
Postman is a Software Development tool used in testing APIs it can be used to test API endpoints and we would be using it to test our ProductCreateViewClass . In the image below we would be making a Post request to the endpoint localhost:8000/api/v2/inventory/new-product
Let's make the Post request you can checkout Youtube.com on how to use Postman as this is beyond the scope of the article, Simply copy and paste the URL for the ProductCreateView mentioned above and make a Post Request to the endpoint using the form-dataoption on Postman . It should look similar to the image below

We should get a response similar to the image below.

Finally, we have successfully uploaded multiple images , I hope you didn't have any difficulties understanding the article.
Wow! You read it all till this point , I hope this was helpful understanding how to upload Multiple Images with Django Rest Framework ?
Thank you for reading this far 😊, Kindly like, share and comment on this article

